If you are lucky enough to own a Silhouette Cameo and you live in the UK, you probably already know that most of the tips and tricks come from our lovely cousins in the US. Although very handy, it can sometimes be a bit tricky to find like for like UK materials.
After a bit of trial and error I thought I would share my method of re-using mats for the UK market :)
It is always handy to have more than one cutting mat - the Silhouette mats are a bit on the pricey side, and in my opinion quite flimsy - it is all too easy to cut straight through the mat with the wrong blade settings (particularly if you are new to using the Silhouette). I recommend using Cricut mats instead :) They are thicker, more durable AND cheaper! In fact, you can even buy two 12" x 24" Cricut mats for £19.00 and cut them down to four 12 x 12 mats - this works out at £4.75 per mat, versus £12.99 for a single Silhouette mat.
The best place for cheap cricut mats is ebay.
I have had my mats since October and December last year. As they are used for business use, they have seen quite a bit of action! Despite this, I have only had to re-stick two once and the other twice! Not too shabby :)
Materials Needed
- 3M Repositionable Mount Spray (must be the repositionable kind!)
- Washing up liquid
- Scraper or old credit card/plastic voucher
- Rubber Gloves
- Masking Tape
- Mask
- Outside Space

After a lot of research the adhesive that was most recommended was the 3M Repositionable Spray Mount. Initially I was put off by the price (almost £15.00 for 400ml on Amazon) but after scouring some ebay deals, I took the plunge. I calculated that you can probably re-spray 10 12 x 12 mats with a 400ml can - £1.50 is a lot cheaper than a new mat. Please make sure you use a mask when using this stuff and spray it outside. It is an adhesive, so just imagine what it would do to your lungs if breathed in!
Step One
You will need to scrub down your mats to remove all the paper and glue residue. I like to use the bath for the 12" x 24" mats as I find it gives me more room (and makes less mess). I use really hot water and washing up liquid to try and loosen up the adhesive. The gloves will help to protect your hands from the heat and give you a better grip when scrubbing. There isn't really a right or wrong way to do this, I use an old Love film voucher card to scrape off the adhesive - be warned you will need lots of elbow grease!
You can use brake cleaner as it is supposed to remove all the adhesive BUT I am yet to use this method. The thought of using such manly chemicals in my bath is a little disconcerting ;)
Once clean, leave to air dry.
Step Two

If like me you use Cricut mats, you will need to use a Silhouette Cameo mat to see what areas should be taped off. You can skip this step, but it ensures that your mat matches up with the Silhouette spacings - nothing worse than accidentally cutting off your mat :(

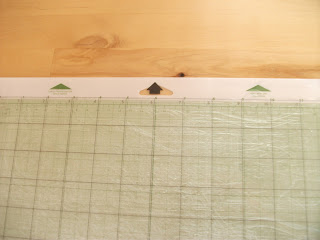
Place the Silhouette Cameo mat over your Cricut mat and note where the lines 'should' be on your Cricut mats. It is important that you check all sides as left and right is slightly different.
Step Three

Using masking tape, section off all the areas that would fall into the adhesive area in a Silhouette mat. Or if you are using a Silhouette mat, just mask off the areas outside of the grid.

Here I have used parcel tape, because I ran out of masking tape so that you can clearly see the areas on a Cricut mat that would be part of the Silhouette Cameo grid.
Step Four
Pop on your mask, head outside and apply a thin coat of 3M adhesive spray. Best way to do this is to hold the can about 15cms from your mat and spray in slow arcs across it, making sure all areas are covered. Take care not to move too slow or quick, and that you aren't trying to spray in high winds.
Step Five

Wait about five minutes and then remove the masking tape - voila, Super Sticky mats again! Whilst waiting, it is a good idea to scrub down your protective clear sheets with water. These get super dusty and you don't want that transferring onto your nice fresh mat :)
In fact, you may find that these are a little too sticky for lighter paper or cards. Making sure my hands are clean, I place my palms repeatedly over the mat to remove some of the tack - perfect :)
My next post is going to feature how to save money on those pricey Silhouette blades - stay tuned!
Comments
Post a Comment