Now I may have read and loved all the books, seen all the films and been captivated with the idea of a magical world, but before our trip I wouldn't have exactly called myself an extreme Potter fan. I would rather die then go out in a cheap polyester cloak, complete with empty lensed Windsor glasses and a fake lightening bolt scar. That said, I was more then a little excited about our upcoming trip to the Harry Potter studio tour.
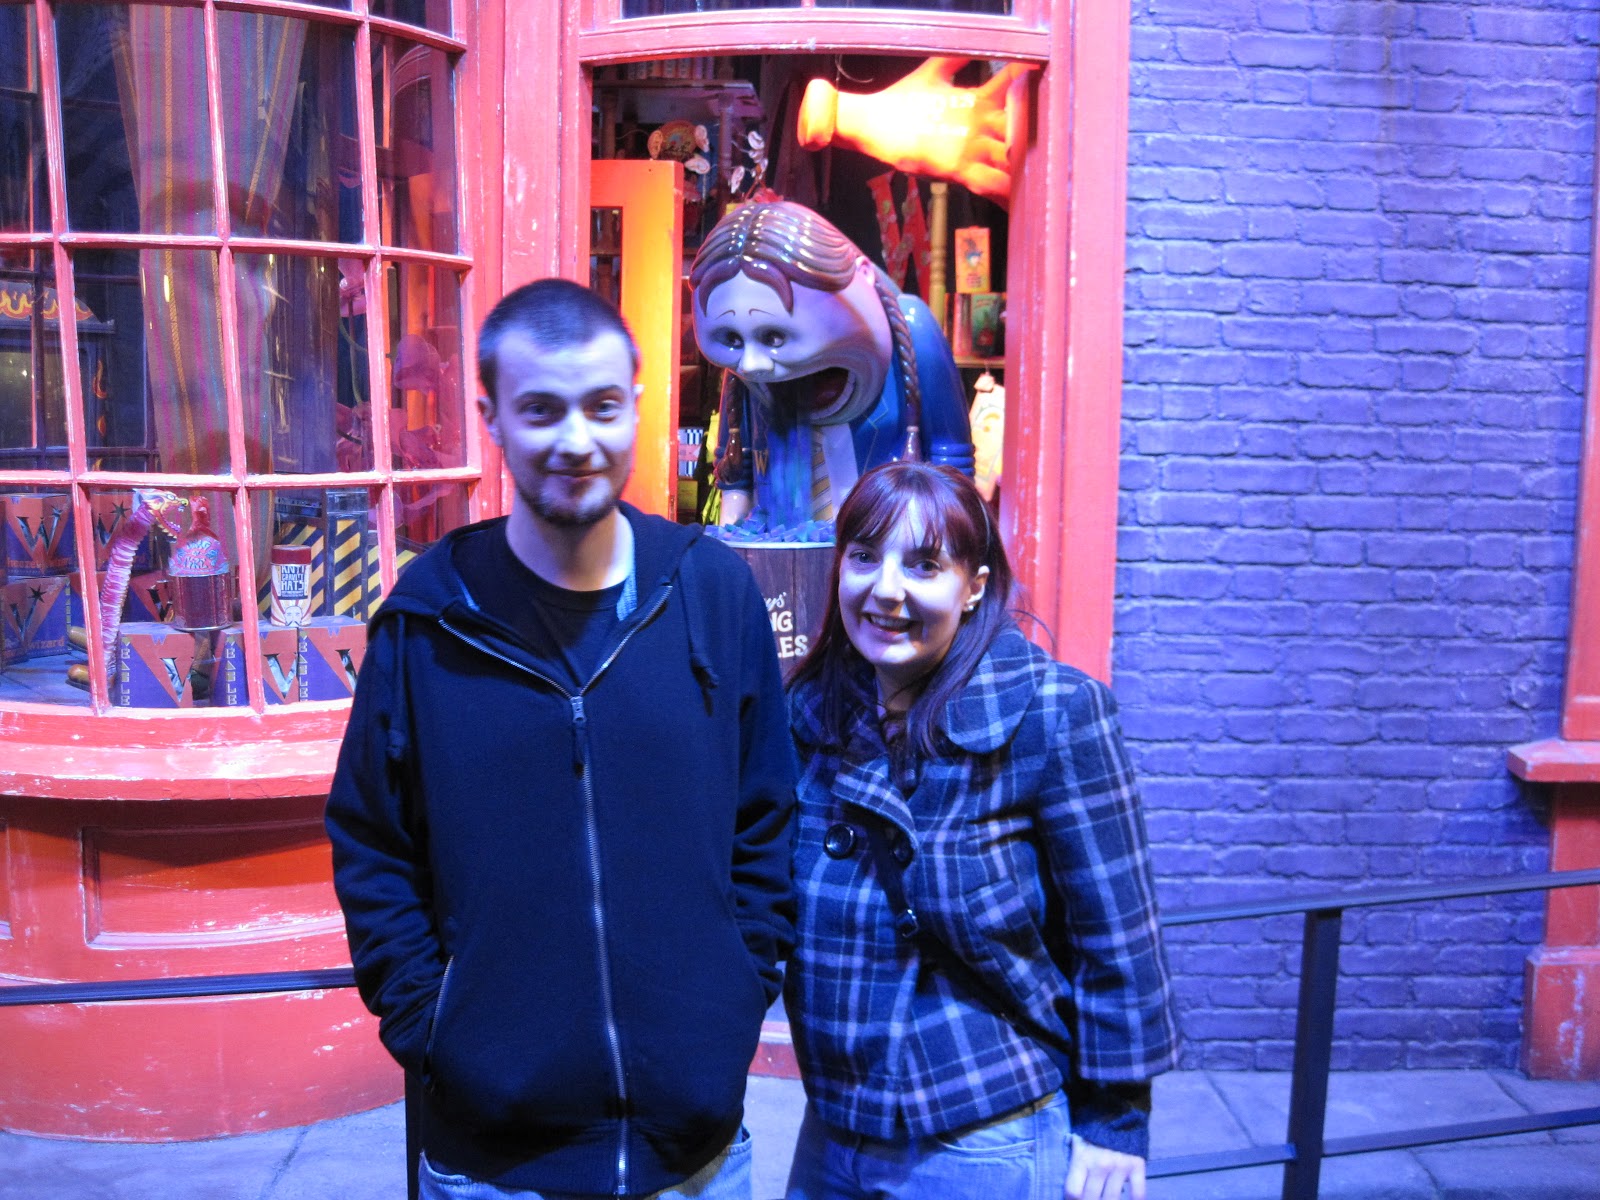
Once there, I was transformed into a small child, eyes wide with amazement, and a grin so huge I was sure my face was going to split! My inner geek was released and reveling in the ocular feast on display. Chris dislikes Harry Potter with a passion, he does however agree that the special effects of the film are astounding and so wanted to attend to see how it was all done. This was my chance to be his personal tour guide, and I tackled this role with as much gusto as Mary Berry would hosting a WI meeting.
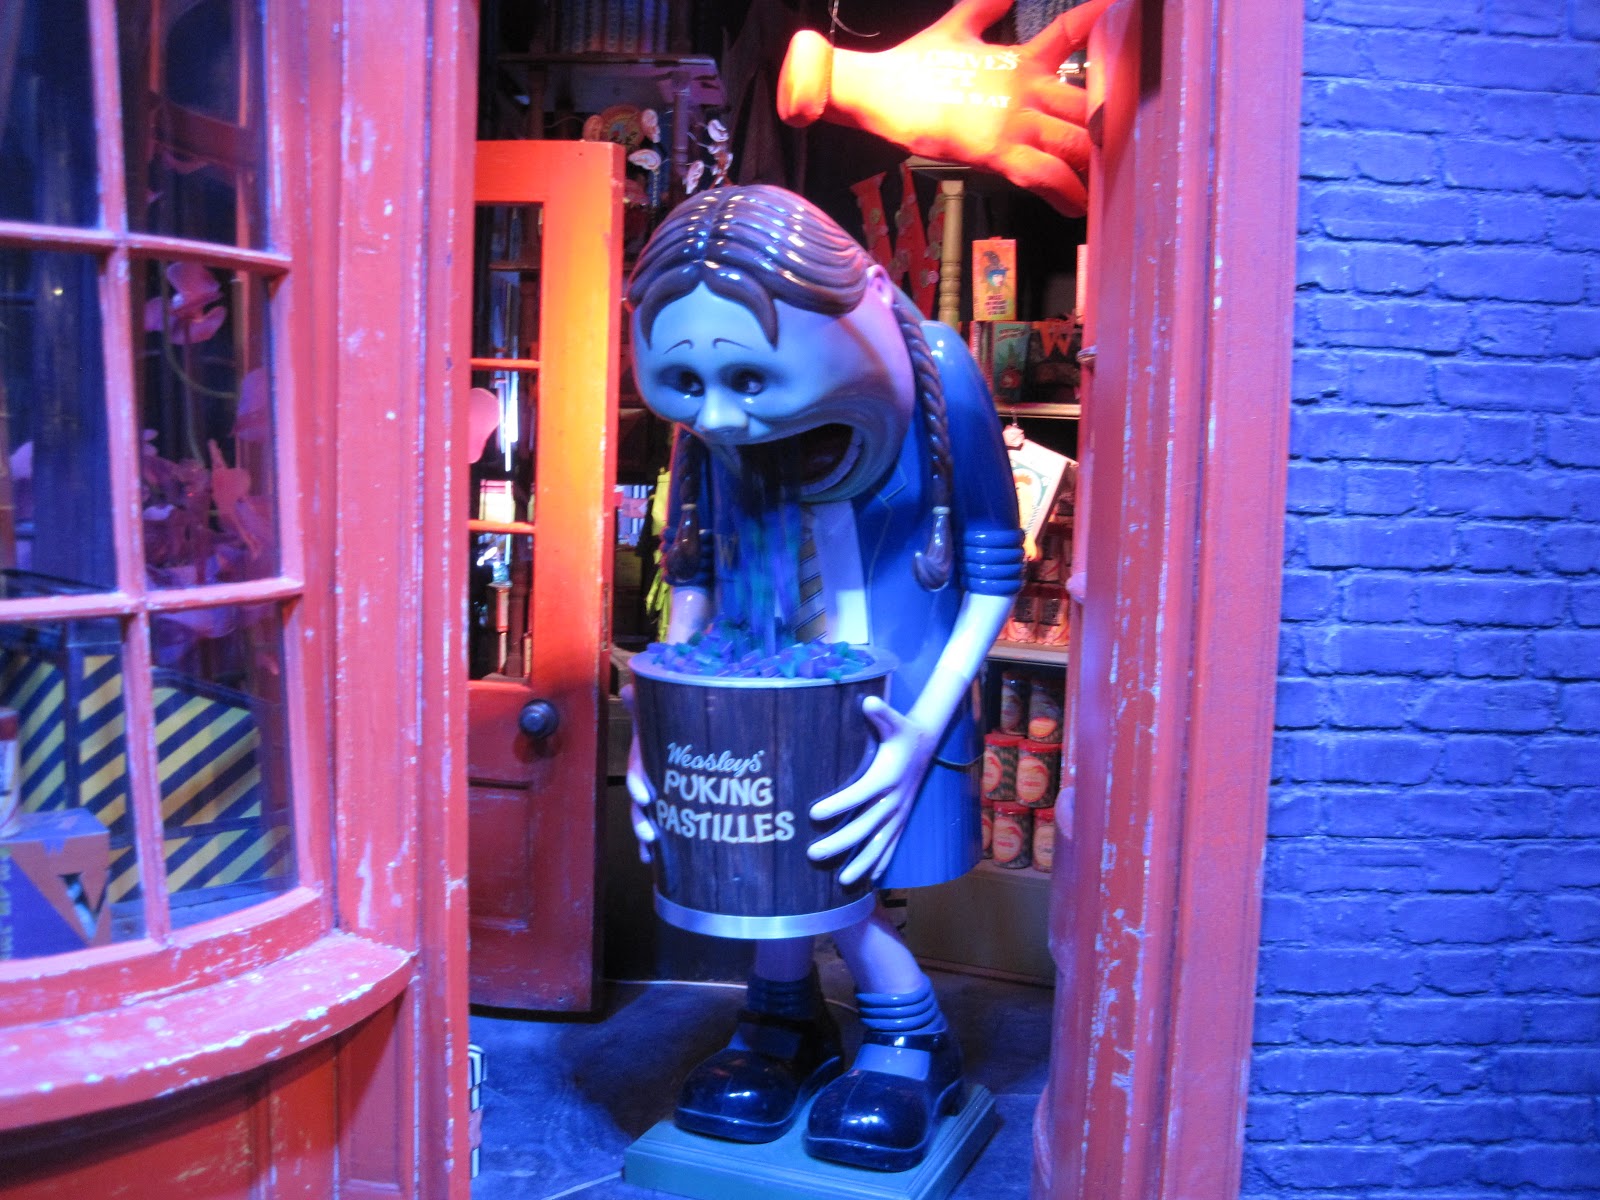
The outside of the building is somewhat nondescript and unassuming The only real giveaway to what lay within the hanger was these rather large chaps below.

Just inside the enterance were the official plaques and a lovely cast of the three main actors hands. And just like a child, I couldn't resist trying each hand for size ;) Emma Watson and I are almost the same size!


We had a little time to kill whilst waiting for the tour to start and so naturally we wondered over to the gift shop. The prices were a little steep, but it was a joy just to wander round and see what was available.


Once inside, we watched a short film featuring the famous trio. They were urging the audience to realize just how much hard work, talent and dedication had gone on behind the scenes, it was this that brought the films to life. I won't spoil the next bit for anyone who is wanting to go to the Studio Tour, but needless to say that the first set that you will see is the Great Hall.
My only gripe about this was that in my opinion, it is the most iconic area of the films and yet we were hurried through so that they could re-set for the next tour. After we had moved from the Great Hall, we were allowed to go at our own pace, which was wonderful.


All of the main sets were on full display, and it was a little eerie feeling as if you were actually within the film. By now I was taking more photo's then a Japanese tourist, and explaining bits to Chris with great enthusiasm. For his part, he was generally interested and kept asking questions about the film.


Whilst we were in Dumbledore's office, Chris asked an innocent question as to why all the portraits were sleeping. A few of the die hard fans shot us such evil looks! It was as if they believed only true fans should be allowed to attend. Once I explained how within the books/films the portraits were 'alive' and this was obviously taken from one of the scenes where the castle was sleeping, Chris seemed quite intrigued and it sparked a discussion on them visiting other portraits etc. - The Potter hater is learning a thing or two ;)
If I were to detail every set, my post would be a mile long and I am sure I would bore a few readers to tears! I will only mention one more of my favorites, if you want to see more, go on the tour!
The Weasley Warren looks so very warm and inviting in the films and the set didn't let me down.


 After the main set tour, there is an outside area where you can see Privet Close, the bus, the Hogwarts bridge and Godric's Hollow. They also served actual butterbeer, and although I didn't partake people seemed very pleased with the results. A key feature to this area, was that unlike the sets that were cordoned off, we had almost free reign here - perfect for photo's!


The last leg of the tour concentrated on the amazing, talented and detailed work that went into making the movies. There was a huge focus on the design, animatronics, make up and architecture. I was completely over-whelmed with the realization of just how much it took to make a film like this. It seriously was mind blowing.


Once there, I was transformed into a small child, eyes wide with amazement, and a grin so huge I was sure my face was going to split! My inner geek was released and reveling in the ocular feast on display. Chris dislikes Harry Potter with a passion, he does however agree that the special effects of the film are astounding and so wanted to attend to see how it was all done. This was my chance to be his personal tour guide, and I tackled this role with as much gusto as Mary Berry would hosting a WI meeting.
The outside of the building is somewhat nondescript and unassuming The only real giveaway to what lay within the hanger was these rather large chaps below.

Just inside the enterance were the official plaques and a lovely cast of the three main actors hands. And just like a child, I couldn't resist trying each hand for size ;) Emma Watson and I are almost the same size!


Daniel Radcliffe

Rupert Grint

Emma Watson
The main foyer features shots of all the characters in the various films. For the younger characters, it was cool to see how much they had aged since the original in 2001. There was also the famous Ford Anglia suspended from the ceiling!


To ensure that people weren't too bored once we started queuing for the tour to start, they had cunningly put Harry's cupboard under the stairs on full display. It was interesting to see all the detail that had gone into this area. The set looked just like it had been taken from someones home!


Once inside, we watched a short film featuring the famous trio. They were urging the audience to realize just how much hard work, talent and dedication had gone on behind the scenes, it was this that brought the films to life. I won't spoil the next bit for anyone who is wanting to go to the Studio Tour, but needless to say that the first set that you will see is the Great Hall.
My only gripe about this was that in my opinion, it is the most iconic area of the films and yet we were hurried through so that they could re-set for the next tour. After we had moved from the Great Hall, we were allowed to go at our own pace, which was wonderful.


All of the main sets were on full display, and it was a little eerie feeling as if you were actually within the film. By now I was taking more photo's then a Japanese tourist, and explaining bits to Chris with great enthusiasm. For his part, he was generally interested and kept asking questions about the film.


Whilst we were in Dumbledore's office, Chris asked an innocent question as to why all the portraits were sleeping. A few of the die hard fans shot us such evil looks! It was as if they believed only true fans should be allowed to attend. Once I explained how within the books/films the portraits were 'alive' and this was obviously taken from one of the scenes where the castle was sleeping, Chris seemed quite intrigued and it sparked a discussion on them visiting other portraits etc. - The Potter hater is learning a thing or two ;)
If I were to detail every set, my post would be a mile long and I am sure I would bore a few readers to tears! I will only mention one more of my favorites, if you want to see more, go on the tour!
The Weasley Warren looks so very warm and inviting in the films and the set didn't let me down.


I loved the Weasley Clock! Each family member has their own hand and it shows their exact position/activity. I thought that the fact that it has a section marked 'Lost' was adorable, luckily no-one was marked as such. I did get a giggle out of the cereal too; Pixie Puffs and Cheeri-Owls.
There was a really clever section where through the art of green screen, you could have a go at being in the movie. I wasn't initially keen to go in as I feared the queue would be enormous, once my Father in Law spotted that there were actually several cubicles and the line was moving at a brisk pace, you couldn't stop me!
There was the choice of donning a prop cloak and hat and riding a broomstick, or sitting in the Ford Anglia. I feared that despite the films fantastic CGI, the quality of the guest booths would be bad - boy was I wrong! Whilst waiting, we had the ability to see the green screen at work with the final products being screened live around the room. It was fantastic! Feeling a little shy, we agreed on the Ford Anglia with all of us squeezing in. I just couldn't stop giggling.

My Mother in Law looks an absolute picture! This had been taken after we all had to do an imaginary roll, and while I couldn't focus on acting due to laughing, my Mother in Law was well and truly in the spirit. Just like most theme park versions, you pay for your photo. I personally think that two photo's for £15 was quite reasonable (compared to some prices) and the fact that we only had to wait 5 minutes for our turn in the car was fantastic!
 After the main set tour, there is an outside area where you can see Privet Close, the bus, the Hogwarts bridge and Godric's Hollow. They also served actual butterbeer, and although I didn't partake people seemed very pleased with the results. A key feature to this area, was that unlike the sets that were cordoned off, we had almost free reign here - perfect for photo's!


The last leg of the tour concentrated on the amazing, talented and detailed work that went into making the movies. There was a huge focus on the design, animatronics, make up and architecture. I was completely over-whelmed with the realization of just how much it took to make a film like this. It seriously was mind blowing.


Sadly, my camera died shortly after taking the last shot above. Although my wonderful in-laws have given me a disc with their photo's on, I have been unable to get them to work on the laptop. I will however be trying with the desktop as the last leg of the tour literally took my breath away and I really want to share it with you all!
Yay for desktops :) I finally have the photo's I wanted to share!
One of the highlights of the tour for me was being able to walk down Diagon Alley! If you ignored the fact that the set was inside, the ceiling was open and that all the shops were just store fronts, it truly was magical. It was an amazing concept to walk on the cobbles and know that this was the exact place that the actors had stood whilst bring this amazing book to life.


After Diagon Alley, we entered the 'technical' area. This section was filled with concept art, architectural drawings and even scale model replica's of the buildings.


It was a bit sad to see that many children didn't seem interested in the technical side of things. These areas seemed to have less foot traffic, with children pulling their parents through to the next 'exciting' section.
Now despite seeing all the minute detail that had gone into this area, nothing prepared me for the final room. I am embarrassed to admit that I did a totally uncharacteristic 'cartoon-style' gasp when I saw this.
Despite scouring the internet for a photo that would do the scale justice, I have really struggled to find one that shows the sheer size. The one above has been borrowed from an Australian news site, and although it comes close, this is only a small section of the castle model. The castle took up a huge cavernous room and a platform walk way had to be constructed so that visitors could see it from various angles. It is rumoured to be almost 50 feet big! That is almost the length of two double decker buses! The Harry Potter studio has calculated that the amount of time it took a team of 86 artists to build, was the equivalent of 74 consecutive years! I just can't get my head round those figures.
The overhead lights were on a timer that dimmed, and then over 2500 fibre optic lights went on within the castle - magical.

Having the scale castle as a grand finale was brilliant. The walkway had interactive screens where you could zoom in on any part of the castle. The detail up close was amazing and it was easy to see just how they achieved such brilliant exterior castle shots using this model.
I cannot recommend the Studio tour enough. In my personal opinion, it has something for everyone, and as my husband demonstrated, you don't even have to be a Harry Potter fan to appreciate this tour. From a technical point of view, it is simply mind blowing.
I wouldn't take any under 10's. It is a long tour - we went at our own pace, and completed it in just under 3 and a half hours. If we had stopped for refreshments, we would have easily been pushing 4, and that doesn't even include the time before in the gift shop. Younger children will get bored, we saw tantrums aplenty. Besides I think it's nicer to let the younger children believe in the magic of Harry Potter for a little longer.
Oh wow! The tour is much larger than I'd imagined. Will definitely be dragging my boyfriend along in the future! Great photos.
ReplyDelete