Well after last weeks bread maker review I had lots of lovely people telling me they were off to purchase a bread maker! Sadly I think that Argos may be depleting the last of their stock as lots of lovelies have told me how much they have struggled trying to source one. (none in my nearest 10 stores!) Some cheeky chappy is also selling the same model on Amazon for £100! And people seem to be paying that price, just goes to show how fantastic the bread maker really is.
So now I have lots of new converts, it seems only fair to share with you one of the easiest, quickest and tastiest bread recipes that we use - for those that have the Cookworks bread maker manual, this recipe is included, however as usual I have tweaked it to make it appeal even more to us. If you don't have a cookworks bread maker, you can still use this recipe providing you have an ultra-fast setting on your machine.


So now I have lots of new converts, it seems only fair to share with you one of the easiest, quickest and tastiest bread recipes that we use - for those that have the Cookworks bread maker manual, this recipe is included, however as usual I have tweaked it to make it appeal even more to us. If you don't have a cookworks bread maker, you can still use this recipe providing you have an ultra-fast setting on your machine.
Ingredients for a 2lb loaf
300ml water (2 parts cold to 1 part boiling)
75g soft/cream cheese
1 tsp salt
3 tbsp sugar (Shockingly this huge amount really is needed, don't be tempted to add less - it is due to it being a quick cook loaf)
1 1/3 tbsp black pepper
520g strong white flour
4 tsp Dried Active Yeast (the one that looks like large round balls rather then granules)
2 tbsp oil (I use extra virgin, but vegetable oil will be fine)
Activating the Yeast
As I mentioned in last weeks review, my yeast of choice is not usually recommend for bread makers. I think this is simply as it needs to be activated first and then used whilst at the right temperature. Providing you use these directions, I promise you that your bread will be so much nicer and your whole home will smell of glorious yeast! (or as my husband calls the aroma; beer!)
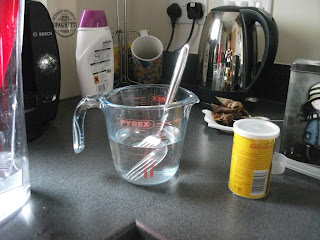
Each recipe will require you to use a different volume of water - whatever the recipe calls for, you need to mix 1 part of boiling water to 2 parts cold. In this recipe I need 300ml, so 200ml is cold whilst 100ml is boiling - this ensures the water is at the correct temperature for the yeast. Too hot and it will die, too cold and it will not activate.
Once you have measured out the water into the jug, stir in the amount of sugar needed (depending on the recipe). This needs to be fully dissolved before adding the yeast.

Once you have dissolved the sugar, add the yeast and make sure it is fully stirred into the water.

The jug now needs to be put somewhere warm for 15 minutes - I pop a tea cosy over mine as we lack a warm airing cupboard.
Preparing The Bread Maker
Make sure the bread kneader is securely placed in the loaf pan. If you don't do this, then you risk a flat inedible bread.

Measure out all of the other ingredients and place them in the pan.

Once the yeast has had it's 15 minutes, you will be left with a beautiful frothy mix. Using a fork, quickly whisk the mix and then pour it into the bread maker.

Set the bread maker to the Ultra Fast setting and make sure you have selected the 2lb loaf size.

Let the bread maker work it's magic and no matter how tempted you are, do NOT lift the lid - you will risk letting out all the heat. As this is a quick cook loaf, the heat needs to be kept in.

58 minutes later, your bread will be finished!

Take the loaf out of the pan immediately, and remove the hook from the bread (if it's become baked in).

If possible, cool your bread on a rack - if you don't you will have a soggy loaf :( - Or as the wonderful Mary Berry calls it; a soggy bottom ;)

Nom Nom!

Comments
Post a Comment