This last week has been very heavy on the craft front! We had two very dear friends get married yesterday, and knowing their unique tastes, I was itching to create a present and card that I hoped would appeal.
I will detail the present in another post, as it is rather lengthy and I wanted to be able to do the card justice.
When Chris and I got married, we were presented with many beautiful cards. It saddened me that I would be unable to display them, and instead have them closed away in our memory box. This gave me the idea of creating a card that could be displayed permanently (if the recipient so wished).
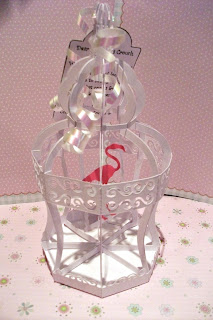
Knowing that the Bride and I have very similar tastes, it didn't take long to come up with a concept - a 3D birdcage. Coupled with the fact that their wedding had accents of flamingo, I knew this design would be perfect featuring a beautiful flamingo within.
Having another opportunity to use my favorite new toy (my Silhouette Cameo) meant that I would be able to achieve very professional results! I would love to say that I managed to completely design the cage myself, but I didn't. I am a great believer in appreciating other artists work, and so when I saw Rivka's design, I fell in love!


I will detail the present in another post, as it is rather lengthy and I wanted to be able to do the card justice.
When Chris and I got married, we were presented with many beautiful cards. It saddened me that I would be unable to display them, and instead have them closed away in our memory box. This gave me the idea of creating a card that could be displayed permanently (if the recipient so wished).
Knowing that the Bride and I have very similar tastes, it didn't take long to come up with a concept - a 3D birdcage. Coupled with the fact that their wedding had accents of flamingo, I knew this design would be perfect featuring a beautiful flamingo within.
Having another opportunity to use my favorite new toy (my Silhouette Cameo) meant that I would be able to achieve very professional results! I would love to say that I managed to completely design the cage myself, but I didn't. I am a great believer in appreciating other artists work, and so when I saw Rivka's design, I fell in love!
Rivka has her designs available on the Silhouette store and I am amazed to say that they only cost 62p for a personal download! I can't get my head around just how cheap this is. For those of you unfamiliar with the Silhouette Store terms, you pay once, and can then use the design as many times as you like for non-profit projects.You are also able to purchase a commercial license for just £5, meaning if you wanted to sell the finished article, you could.
I opted for the middle design (although I may be purchasing the other two) and although I loved the blue shown, I knew that brilliant white would make the flamingo pink pop!
The next step was figuring out where to put the wording for the actual 'card' part. I decided to design a cute little tag which featured a matching design on the outer side, and some heart felt words on the underneath. I attached this with some pearlescent ribbon, and et voila!:


The card seems to have been a hit, and I am keen to make some to decorate my work room with. Having a group of these hung from the ceiling at different heights, would look absolutely darling. I am also planning on making some miniature ones featuring robins and turtle doves to decorate the tree with.
For anyone that would like the technical details, I used 160gsm brilliant white card for the cage, the flamingo outline was downloaded, edited and converted from the net, and then cut from 80gsm sugar paper. The designer suggested using glue to assemble, but knowing what a nightmare that can be, I decided to use double sided craft tape - it may have taken longer, but it gave a very clean finish.
The cut settings for my cameo were; Custom - Blade depth 4, Speed 5 and double cut - This gave a very crisp cut that didn't need any re-working.
The total time, including download, re-sizing, cutting, assembling the cage, and designing/printing the tag, probably took me 3 hours. I think the main reason I took so long, was because this was my first attempt, and I had run out of my preferred A3 card, and had to re-size for A4.
This is stunning!!
ReplyDeleteSherie x