Time and time again in the Etsy forums, there are people completely over-whelmed with the whole photography process. I was there once, and although still a million miles away from an expert, I have learnt a thing or two along the way.
Imagine you are planning an online purchase, one of the joint most important swaying factors will be a products image - the other is usually the cost. There are plenty of examples of bad shop photography on Etsy - heck, just check this one that I took back in November 2011 - It was sadly one of the 'better' images that actually made it into the shop.
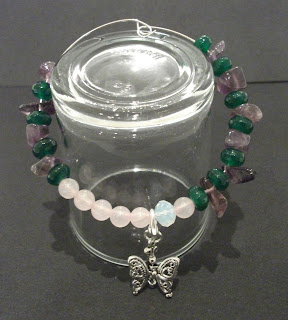


Imagine you are planning an online purchase, one of the joint most important swaying factors will be a products image - the other is usually the cost. There are plenty of examples of bad shop photography on Etsy - heck, just check this one that I took back in November 2011 - It was sadly one of the 'better' images that actually made it into the shop.

Besides the actual bracelet, lets discuss what is wrong with this picture;
Background
Unless the item being photographed is extremely bright, dark coloured or busy backgrounds are a no-no. You should aim for a clean, uncluttered background that is devoid of anything that may detract from the item you are photographing. Your item should be the main focus, get rid of anything that draws the eye away from it.
Lighting
This is one of the most difficult aspects of photography - it is still the main thing that I struggle with now. Shockingly I used to take photographs from inside the tub! My theory was that the white bath tub would magnify any light in the bathroom and help to illuminate my items. Sadly we have no window in our bathroom, no natural light and inadequate artificial sources, equal terrible photographs.
Can you see how part of the image is slightly blurred or 'noisey'? This is all due to incorrect ISO settings - If you take a photograph with an automatic camera in low level lighting, it will generally crank up the ISO setting - this creates a 'noisy' image. You should aim for a low ISO setting (on manual mode you should be able to adjust this) photographed in good lighting.
Focus
Part of this is to do with the lighting and ISO setting - but part is due to me not using the macro setting on my camera. When photographing something close up, you should always aim to use the macro mode - this helps the camera define a nice sharp focus on your item.
Generally the above 3 are the main contenders for poor image shots - I was initially advised to use a light tent to photograph my jewellery, but I found it quite impractical and was not happy with the results. I thought I would share my current set up. Aside from the cost of the camera, the only thing I have had to pay for is the 'background' and that only cost £1.00 from wilkinsons :)
What you will need
- Surface to work on - in full natural light, ideally near a window
- Roll of white poster paper - purchased from Wilkinsons - £1.00 a roll
- Blue tack - we generally have some hiding around the house
- Gimp image editing software - downloaded for free from here

Place your roll of paper on the surface you wish to work on and blue tack the top two corners

Unroll the paper and attach to the wall

adjust the paper so that it covers the back wall and the surface you are working on - this will prevent distinction between the background and surface that could draw the eye away from the item

Position your items ready to be photographed - make sure you take into account any reflections or shadowing that may show up on your photographs
Camera Settings
Because of the way in which light is always changing, you should make sure to adjust these settings for each new session. I am sure that there is much more in-depth information for camera settings, but as said at the beginning of this guide - this is basic level and simply what I do.
- Make sure your camera is on manual settings rather than automatic
- Adjust your ISO settings to the lowest possible - I use 100
- If possible adjust your exposure compensation - look through the lens and adjust the compensation until what you see onscreen is similar to what you can actually see
- Adjust white balance - focus the camera on the white background, adjust the white balance until what you see onscreen is a true white. There are cameras that allow you to take a photograph of the white background and will automatically adjust the settings to achieve a 'true' white - sadly mine has to be done the old fashioned way.
- Turn on macro settings - usually this is a silhouette of a flower
- Turn off the flash
Point and Shoot
When photographing your items, you need a variety of angles and close ups to show potential customers as much detail as possible. Imagine you are picking up an item, what would you be focusing on, what would you lean in to see more clearly. Try to get your images to mimic this.
If possible you should try to take your photographs with a tripod - I don't own one so cannot guide you through the process, but it is something that I am considering investing in.
Never take one shot of each angle - generally I will take at least 40 images of each product, all but 5 of these are discarded. You should be picking the best from a wide selection, this will give you a better chance of achieving a great shot.
My camera has a two step process when shooting in macro mode - when I press the shutter button initially it will focus, I will then get the green light to press again to capture - make sure you understand how your camera works. Camera shake will result in a 'noisy' unsharp image - this is why a tripod (or stable surface) is recommended.
Post Editing
I edit every single one of my selected images before listing an item - it is vital for cropping and cleaning them up. The most important basics (that I consider) are obviously cropping and the colour levels. Gimp offers a wide variety of editing tools, but these two are used the most in my shop.
Right click your image and select 'edit in gimp'
Once opened, click on the 'colours' tab, and then press 'levels'
A box labelled 'adjust color levels' will open
Firstly try pressing the 'auto' button - if this is shockingly off, press the 'reset' button
If you still need to tweak your colour levels, select the white eye dropper tool and then click on an area of your picture that is supposed to be white (like the background) you can keep clicking different areas of white until you are happy with your image
Press the rectangle select tool and highlight the area of the image that you would like to crop to - if you need to make minor adjustments, you can hover close to the edges until a T shape appears, you can then drag out
Once happy with the selected area, click on the top 'image' tab and then press crop to selection
Here is a before and after shot using just 'color levels' and crop - a big difference, I am sure you will agree!

Before

After
I have also added text to the after shot using gimp
I hope this helps you achieve a better understanding of entry level product photography, fingers crossed I can add more 'advanced' techniques as I learn them :)
Brilliant advice :-) This will really help me photograph my jewellery! The after shot above looks great x
ReplyDeleteThanks Bean :)
DeleteThank you so much! A friend from my Dorset Etsy Team mentioned this article and It has made such a difference to my pictures.
ReplyDeleteSo glad I could help Zirisi :)
DeleteReally appreciate the tips re gimp:) I have downloaded it but have to admit to feeling a bit lost to say the least!!
ReplyDeleteIt can feel a bit over-whelming at first, but keep at it. I found following youtube tutorials really helpful :)
Delete